At this tutorial we will learn PLC by simulator using i-TRiLOGI. There are many simulator of PLC today, but just a few program that give us free resource to explore. One of a free educational PLC simulator program is i-TRiLOGI. This program is a programming software for TRIPLC products such as Nano-10, FMD, and F-series PLCs via LAN or Internet. You can read more info from the official website at http://www.triplc.com/trilogi.htm. This tutorial will show you how getting started with i-TRiLOGI and start learning PLC simulation in a few simple steps.


After you complete the information, click “Submit” button. You will directed to confirmation page that your request is completed.


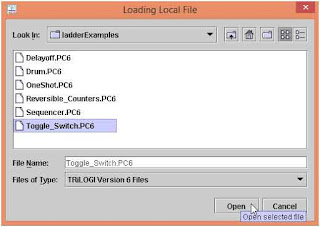
Go to “usr/samples/ladderExamples” folder and select file “Toggle_Switch.PC6” then click “Open” button. This command will open sample project file that will toggle switch on output port.
Toggle Switch program will show you how to program PLC in ladder diagram. This program will toggle output port. This sample show you three approaching algorithm to do that function. You can read the explanation clearly from the comment of the program. For this tutorial we will not focus on algorithm, but our focus is on how getting started with i-TRiLOGI program.


This command will guide you to simulator. Click input (ST1, ST2, or ST3) to see the respond at the output. The output will toggle the indicator as your input condition.

The simulator also update the status on ladder diagram as shown below. You can analyze how the program running from this diagram.


Try another button at the bottom of View Variable window. You can see another detail or hexadecimal value of the memory.

Step 1. Request Download Link i-TRiLOGI
Go to http://www.triplc.com/edutrilogi.htm to request i-TRiLOGI installer. You have to fill some information about yourself to get download link. The download link will be sent to your email address. Make sure your email is active and accessible before request the download link.
After you complete the information, click “Submit” button. You will directed to confirmation page that your request is completed.
Step 2. Get Download Link
Open your email that you used to request download link of i-TRiLOGI. Click the link to download the installer of the program.
Step 3. Accept Agreement
The download link will direct you to agreement page. Scroll the agreement page downward and click “I Agree...” to proceed next step.
Step 4. Download Installer
After you accept the agreement, you will see the real download link for installer. Click link of “SetupTL7Edu.exe” at number 2. Save this file to your computer.
Step 5. Install i-TRiLOGI
There are some steps you have to complete the installation process. Here are the installation progress in details.- Go to downloaded file. Click SetupTL&Edu.exe to begin installation process. If you are prompted to run this program as Administrator privilege then click “OK” (on Windows 7 or Windows 8 operation system).
- Confirm Installation Click “Yes” to continue installation.

- Welcome Message Click “Next” to welcome message and follow the next instruction.

- Insert Installation Password The next instruction will request your installation password. If you have followed this tutorial from the beginning then you get your password email confirmation that show you the download link (step 2). Copy-paste your password from the email then click “Next”.


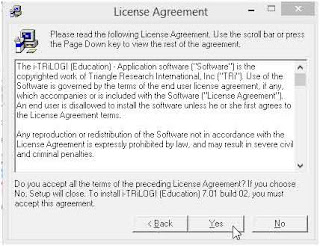
- License Agreement Click “Yes” to license agreement confirmation.

- Information Click “Next” to continue installation.

- Destination Directory Let the destination folder to be set as default and click “Next” to proceed. Off course you can change the destination folder if you wish, but you have to remember where it is.

- Select Program Group Let program group set as default and click “Next”. You can change it if you really wished.

- Install i-TRiLOGI You are reaching the main installation process now. Click “Install” and wait several minutes to extract and copy program to your computer.

You can monitor the progress from Setup window.

- Java 2 License Agreement If you have been installed Java 2 Runtime Environment before, then you have complete the installation and do not need to follow this instruction. Just go to step 6. But if your computer don’t have Java 2 Runtime Environment, then you will see the following window after i-TRiLOGI complete the installation. This window will guide you to install Java 2 RE to your computer. Make sure you have internet connection on your PC to download Java 2 RE. Accept the license agreement and click “Next”.

- Setup Type Choose typical setup type and click “Next”.

- Installing Java 2 RE Make sure your computer connected to internet. The installation window will download installer online and copy it to your computer. Wait several minutes to complete Java 2 RE installation.

- Finish Java 2 RE Installation All i-TRiLOGI requirement have been complete. Click “Finish” and follow next instruction.

- Finish i-TRiLOGI Installation Click “Next” on information window.

Click “Finish” to complete your setup process. Now you have i-TRiLOGI program that ready to run on your system.

Step 6. Run i-TRiLOGI
If you are using Windows 8 Operation System then search your program and click i-TRiLOGI icon.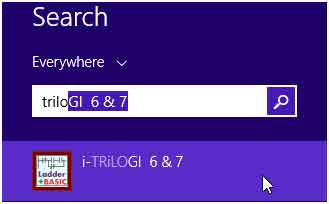
Step 7. Select Version
You will be prompted to version selection of i-TRiLOGI. You can select any version you like. For this tutorial we will use TL6 Version. After you select the version then click “Start” button.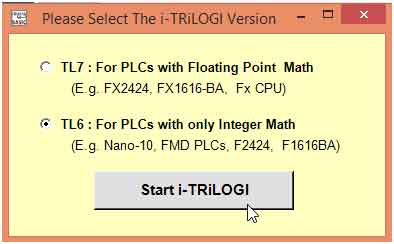
Step 8. First Look
If your installation completed well, then you see the program running and open new project window as captured bellow. To have an overview how operate the program and running simulation of PLC, we will open example program that provided by the installation.Step 9. Open Sample Project
Click “File” menu and select “Open”. It will guide you to file browser window to select your available project.Go to “usr/samples/ladderExamples” folder and select file “Toggle_Switch.PC6” then click “Open” button. This command will open sample project file that will toggle switch on output port.

Toggle Switch program will show you how to program PLC in ladder diagram. This program will toggle output port. This sample show you three approaching algorithm to do that function. You can read the explanation clearly from the comment of the program. For this tutorial we will not focus on algorithm, but our focus is on how getting started with i-TRiLOGI program.

Step 10. Run Simulation
Click “Simulate” menu and click “Run” or you can press shortcut key with Ctrl+F9.
This command will guide you to simulator. Click input (ST1, ST2, or ST3) to see the respond at the output. The output will toggle the indicator as your input condition.
The simulator also update the status on ladder diagram as shown below. You can analyze how the program running from this diagram.

Step 11. See Details
To see details condition of memory in PLC, you can do this by clicking “View” button at simulator window. This command will open “View Variable” window that show you condition of input, output, and relay.
Try another button at the bottom of View Variable window. You can see another detail or hexadecimal value of the memory.
