Example Multi-level Networks with IP Address:
PLC 1 with IP Address 192.168.111.1
PLC 2 with IP Address 192.168.111.2
PLC 3 with IP Address 192.168.111.3

1. AJ71E71 Ethernet interface card And Mitsubishi A Series PLC
Hardware Settings
The DIP switches on the AJ71E71 Ethernet interface card must be set as follows.
1. DIP switches 1-6 must be set to OFF.
2. DIP switch 7 must be set to ON.
3. DIP switch 8 must be set to OFF.
Initialization Ladder Program
The following initialization code sets the IP address of the device and triggers execution of the open code.
IP Address 192.168.111.1 converts to Hexadecimal:
192 = convert to hexadecimal = C0
168 = convert to hexadecimal = A8
111 = convert to hexadecimal = 6F
1 = convert to hexadecimal = 1
192.168.111.1 = convert to hexadecimal = C0.A8.6F.1 and input data to PLC = C0A86F1
For this example:
IP of 192.168.111.123 (C0.A8.6F.7B Hex) and input data to PLC = C0A86F7B

2. A1SJ71QE71 Ethernet interface card And Mitsubishi QnA Series PLC
Hardware Settings
The DIP switches on the A1SJ71QE71 Ethernet interface card must be set as follows:
1. DIP switches 1-2 must be set to OFF.
2. DIP switch 3 must be set to ON.
3. DIP switches 4-6 must be set to OFF.
4. DIP switch 7 must be set to ON.
5. DIP switch 8 must be set to OFF.
Initialization Ladder Program
The following initialization code sets the IP address of the device and triggers execution of the open code.
For this example, an IP Address 192.168.111.123 converts to Hexadecimal:
192 = convert to hexadecimal = C0
168 = convert to hexadecimal = A8
111 = convert to hexadecimal = 6F
123 = convert to hexadecimal = 7B
IP of 192.168.111.123 (C0.A8.6F.7B Hex) and input data to PLC = C0A86F7B

3. QJ71E71-100 Ethernet module And Mitsubishi Q Series PLC
The newest Q Series Ethernet modules (QJ71E71-100) do not have DIP switches that need to be set. Furthermore, special ladder logic to enable Ethernet communications is not required. Users must set network related parameters in the controller, however, using the Mitsubishi GX Developer software.
Device Configuration
1. To start, create a new GX Developer project for a Q Series (Q mode) PLC. Alternatively, open and edit an existing project.
2. Next, select Network Param.

3. In Network Parameter, click MELSECNET/Ethernet.

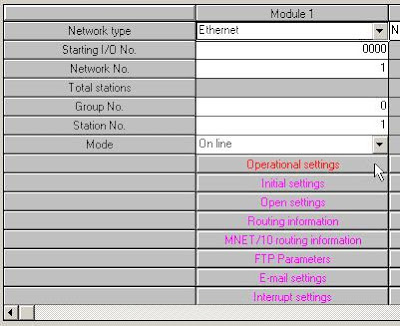
4. Fill in the required information for the Ethernet module. Although the network type must be Ethernet, other settings will depend on the particular application. The example below is for station 1 on network 1. The starting I/O No. is 0 in this case because the QJ71E71 Ethernet module is installed in the slot adjacent to the CPU. If there are other modules between the CPU and Ethernet unit, determine the total I/O mapped to those and set the starting I/O of the Ethernet unit accordingly. Once these basic network settings are specified, click on Operational Settings.
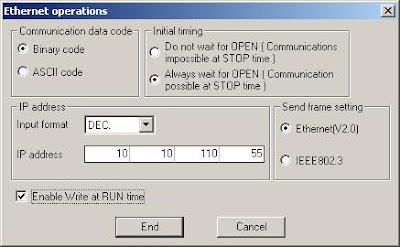
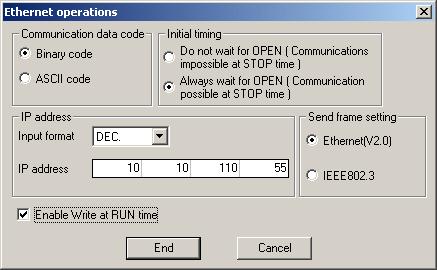
5. The Ethernet Operations dialog is used to define the device's IP address. Except for the IP address, the settings should be as shown below.
Note : unless security or safety concerns require otherwise, make sure "Enable Write at RUN time" is checked. If this is left unchecked, all writes will fail when the PLC is in Run mode.
6. Click End.
7. Upon returning to the basic network parameters dialog, click Open settings.

PLC 1 with IP Address 192.168.111.1
PLC 2 with IP Address 192.168.111.2
PLC 3 with IP Address 192.168.111.3

1. AJ71E71 Ethernet interface card And Mitsubishi A Series PLC
Hardware Settings
The DIP switches on the AJ71E71 Ethernet interface card must be set as follows.
1. DIP switches 1-6 must be set to OFF.
2. DIP switch 7 must be set to ON.
3. DIP switch 8 must be set to OFF.
Initialization Ladder Program
The following initialization code sets the IP address of the device and triggers execution of the open code.
IP Address 192.168.111.1 converts to Hexadecimal:
192 = convert to hexadecimal = C0
168 = convert to hexadecimal = A8
111 = convert to hexadecimal = 6F
1 = convert to hexadecimal = 1
192.168.111.1 = convert to hexadecimal = C0.A8.6F.1 and input data to PLC = C0A86F1
For this example:
IP of 192.168.111.123 (C0.A8.6F.7B Hex) and input data to PLC = C0A86F7B

2. A1SJ71QE71 Ethernet interface card And Mitsubishi QnA Series PLC
Hardware Settings
The DIP switches on the A1SJ71QE71 Ethernet interface card must be set as follows:
1. DIP switches 1-2 must be set to OFF.
2. DIP switch 3 must be set to ON.
3. DIP switches 4-6 must be set to OFF.
4. DIP switch 7 must be set to ON.
5. DIP switch 8 must be set to OFF.
Initialization Ladder Program
The following initialization code sets the IP address of the device and triggers execution of the open code.
For this example, an IP Address 192.168.111.123 converts to Hexadecimal:
192 = convert to hexadecimal = C0
168 = convert to hexadecimal = A8
111 = convert to hexadecimal = 6F
123 = convert to hexadecimal = 7B
IP of 192.168.111.123 (C0.A8.6F.7B Hex) and input data to PLC = C0A86F7B

3. QJ71E71-100 Ethernet module And Mitsubishi Q Series PLC
The newest Q Series Ethernet modules (QJ71E71-100) do not have DIP switches that need to be set. Furthermore, special ladder logic to enable Ethernet communications is not required. Users must set network related parameters in the controller, however, using the Mitsubishi GX Developer software.
Device Configuration
1. To start, create a new GX Developer project for a Q Series (Q mode) PLC. Alternatively, open and edit an existing project.
2. Next, select Network Param.

3. In Network Parameter, click MELSECNET/Ethernet.

4. Fill in the required information for the Ethernet module. Although the network type must be Ethernet, other settings will depend on the particular application. The example below is for station 1 on network 1. The starting I/O No. is 0 in this case because the QJ71E71 Ethernet module is installed in the slot adjacent to the CPU. If there are other modules between the CPU and Ethernet unit, determine the total I/O mapped to those and set the starting I/O of the Ethernet unit accordingly. Once these basic network settings are specified, click on Operational Settings.

5. The Ethernet Operations dialog is used to define the device's IP address. Except for the IP address, the settings should be as shown below.
Note : unless security or safety concerns require otherwise, make sure "Enable Write at RUN time" is checked. If this is left unchecked, all writes will fail when the PLC is in Run mode.
6. Click End.
7. Upon returning to the basic network parameters dialog, click Open settings.
