This PLC application about how to use Nikon Digital Camera for connecting to PLC with using Raspberry Pi 2. this application for photographing, example:
Automatically take picture when:
In Raspberry Pi using Raspberry pi 2 with Raspbian Wheezy OS and use python 2.7
In PLC using Siemens S7-200 with Modbus Support or another PLC with Modbus Support.


sudo cp /boot/cmdline.txt /boot/cmdline.bak
sudo cp /etc/inittab /etc/inittab.bak
sudo nano /boot/cmdline.txt
Remove "console=ttyAMA0,115200"
Ctrl+X to exit, Y to save followed by enter twice
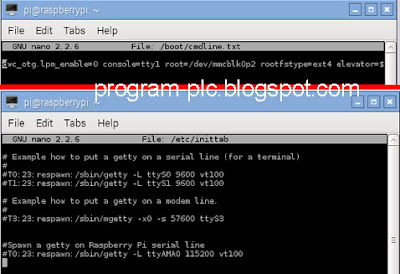
sudo nano /etc/inittab
Put a '#' before "T0:23:respawn:/sbin/getty -L ttyAMA0 115200 vt100
Ctrl+X to exit, Y to save followed by enter twice

cd /home/pi
cd pyserial-2.7
sudo python setup.py install
cd /home/pi
cd MinimalModbus-0.6
sudo python setup.py install
Install via Internet Access:
Open LX-Terminal and type:
cd ~
sudo apt-get install libltdl-dev libusb-dev libusb-1.0 libexif-dev libpopt-dev
Optional: Raspberry Pi Disconnected from Internet
Already Project file to folder /home/pi on Raspberry Pi 2

cd ~
cd libgphoto2-2.5.8
sudo chmod 777 * -R
./configure
sudo make install
cd ~
cd gphoto2-2.5.8
sudo chmod 777 * -R
./configure
sudo make install
cd ~
gphoto2 --version
If Error:
gphoto2: error while loading shared libraries: libgphoto2.so.6: cannot open shared object file: No such file or directory
in LX Terminal type:
sudo ln -s /usr/local/lib/libgphoto2.so.6 /usr/lib/libgphoto2.so.6
If Error:
gphoto2: error while loading shared libraries: libgphoto2_port.so.12: cannot open shared object file: No such file or directory
in LX Terminal type:
sudo ln -s /usr/local/lib/libgphoto2_port.so.12 /usr/lib/libgphoto2_port.so.12
in LX Terminal type:
cd ~
gphoto2 --auto-detect
gphoto2 --summary

If Error:
Camera already ..
From Remove Camera such as Storage Mass
sudo killall gvfs-gphoto2-volume-monitor
sudo chmod -x /usr/lib/gvfs/gvfs-gphoto2-volume-monitor
cd ~
sudo nano auto-startup.sh
in editor, type in this script:
#!/bin/sh
cd /
cd home/pi
sudo python take-photo-plc.py
cd /

and then:
CTRL+X , press Y, enter
cd ~
sudo chmod 755 auto-startup.sh
sudo sh auto-startup.sh
CTRL+C for Stop
sudo crontab -e
In editor, go to bottom and type:
@reboot sh /home/pi/auto-startup.sh >/home/pi/startuplog 2>&1

CTRL+X , press Y, enter

Automatically take picture when:
- products that are not good (NG) or reject
- at a certain time, the worker does not exist in the machine
- emergency stop in the machine, and etc.
In Raspberry Pi using Raspberry pi 2 with Raspbian Wheezy OS and use python 2.7
In PLC using Siemens S7-200 with Modbus Support or another PLC with Modbus Support.
Video Demonstration for Automatic Capture Image using Nikon Digital Camera - PLC - Raspberry Pi 2
Hardware needed for Digital Camera Application
- Digital Camera with PTP Support, I use Nikon COOLPIX S2800 Compact Digital Camera
- Raspberry Pi 2
- PLC that is Modbus Support, I use Siemens PLC S7-200
- Male RS232 - TTL Module
- RS232 PLC Cable
- Power Supply for Raspberry Pi
- 2 pieces Push Button Switch for test

Hardware Connection for Digital Camera Application

Software needed for Digital Camera Application
- Raspbian Wheezy OS : https://www.raspberrypi.org/downloads/raspbian/
- gphoto2 reference : http://gphoto.sourceforge.net/doc/manual/ref-gphoto2-cli.html
- Project file for Raspberry Pi Setup, click here
Raspberry Pi Setup for Digital Camera Application
A. Serial Modbus Setup on Raspberry Pi 2
STEP 1:
In LXTerminal:sudo cp /boot/cmdline.txt /boot/cmdline.bak
sudo cp /etc/inittab /etc/inittab.bak
sudo nano /boot/cmdline.txt
Remove "console=ttyAMA0,115200"
Ctrl+X to exit, Y to save followed by enter twice

sudo nano /etc/inittab
Put a '#' before "T0:23:respawn:/sbin/getty -L ttyAMA0 115200 vt100
Ctrl+X to exit, Y to save followed by enter twice
STEP 2:
Copy Paste All Project file to folder /home/pi on Raspberry Pi 2
STEP 3:
In LXTerminalcd /home/pi
cd pyserial-2.7
sudo python setup.py install
STEP 4:
In LXTerminalcd /home/pi
cd MinimalModbus-0.6
sudo python setup.py install
B. gphoto2 Setup on Raspberry Pi 2
STEP 1:
Raspberry Pi Connected to Internet via Ethernet/LANInstall via Internet Access:
Open LX-Terminal and type:
cd ~
sudo apt-get install libltdl-dev libusb-dev libusb-1.0 libexif-dev libpopt-dev
Optional: Raspberry Pi Disconnected from Internet
STEP 2:
Camera do not Connected to Raspberry PiAlready Project file to folder /home/pi on Raspberry Pi 2

STEP 3: libgphoto2-2.5.8 setup
in LX-Terminal and type:cd ~
cd libgphoto2-2.5.8
sudo chmod 777 * -R
./configure
sudo make install
STEP 4: gphoto2-2.5.8 setup
in LX-Terminal and type:cd ~
cd gphoto2-2.5.8
sudo chmod 777 * -R
./configure
sudo make install
STEP 5: Check the installed gphoto2 is Success
in LX Terminal type:cd ~
gphoto2 --version
If Error:
gphoto2: error while loading shared libraries: libgphoto2.so.6: cannot open shared object file: No such file or directory
in LX Terminal type:
sudo ln -s /usr/local/lib/libgphoto2.so.6 /usr/lib/libgphoto2.so.6
If Error:
gphoto2: error while loading shared libraries: libgphoto2_port.so.12: cannot open shared object file: No such file or directory
in LX Terminal type:
sudo ln -s /usr/local/lib/libgphoto2_port.so.12 /usr/lib/libgphoto2_port.so.12
STEP 6: Camera Check
Camera Connected to Raspberry Pi via USBin LX Terminal type:
cd ~
gphoto2 --auto-detect
gphoto2 --summary

If Error:
Camera already ..
From Remove Camera such as Storage Mass
sudo killall gvfs-gphoto2-volume-monitor
sudo chmod -x /usr/lib/gvfs/gvfs-gphoto2-volume-monitor
C. Auto Startup Python Script on Raspberry Pi 2
STEP 1:
in LX Terminal type:cd ~
sudo nano auto-startup.sh
in editor, type in this script:
#!/bin/sh
cd /
cd home/pi
sudo python take-photo-plc.py
cd /

and then:
CTRL+X , press Y, enter
STEP 2:
in LX Terminal type:cd ~
sudo chmod 755 auto-startup.sh
STEP 3:
Script Test, in LX Terminal type:sudo sh auto-startup.sh
CTRL+C for Stop
STEP 4:
in LX Terminal type:sudo crontab -e
In editor, go to bottom and type:
@reboot sh /home/pi/auto-startup.sh >/home/pi/startuplog 2>&1

CTRL+X , press Y, enter
STEP 5:
Auto Start the Desktop (LXDE)- in LX Terminal type: sudo raspi-config
- 2.Select Enable Boot to Desktop/Scratch from the menu and press Enter
- 3.Select Desktop Login as user pi at the Graphical Desktop.
- 4.Select <Finish> and Enter, then select <Yes> to reboot.
PLC Programming for Automatic Capture Image
- Project file for Siemens PLC S7-200, click here
- Download PLC Ladder Programming to PLC using PLC Software

Python Code for Automatic Capture Image
import serial
import minimalmodbus
from datetime import datetime
import os
from subprocess import PIPE, Popen
import threading
import time

seconds_error = 40.0 #TimeOut Camera Processing

def cmdline(command):
    process = Popen(
        args=command,
        stdout=PIPE,
        shell=True
    )
    return process.communicate()[0]

def error_reboot():
    status=[]
    status.append(0)#commend reset
    status.append(255)#255 error
    plc_instrument.write_registers(1,status)
    plc_instrument.write_registers(1,status)
    print "Error Reboot"
    os.system("sudo reboot")


data = cmdline("gphoto2 --auto-detect")
#print data
check=data.find("PTP")
if check==-1:
    print "Camera No Detect"
    os.system("sudo reboot")
else:
    print "Camera OK"


#ModBus Setting , Address Slave = 1
plc_instrument = minimalmodbus.Instrument('/dev/ttyAMA0',1)
plc_instrument.serial.baudrate = 9600
plc_instrument.serial.bytesize = 8
plc_instrument.serial.parity = serial.PARITY_EVEN
plc_instrument.serial.stopbits = 1
plc_instrument.serial.timeout = 0.2
plc_instrument.mode = minimalmodbus.MODE_RTU


while True:
    try:
        t=datetime.now()
        plc_instrument.write_register(0,t.second)
        command = plc_instrument.read_register(1)
        if command==1:
            #print "Capture Image"
            plc_instrument.write_register(2,1) #1=process
            error_check=threading.Timer(seconds_error,error_reboot)
            error_check.start()
            data = cmdline("gphoto2 --capture-image")
            error_check.cancel()
            print data
            status=[]
            status.append(0)
            rec=data.find("New file")
            if rec==-1:
                #254 error
                status.append(254)
            else:
                #2 ok
                status.append(2)
            plc_instrument.write_registers(1,status)

        if command==2:
            #print "Camera Closed"
            plc_instrument.write_registers(1,[0]*2)
            os.system("sudo reboot")
    except Exception, e:
        pass